 button in the toolbar. To pause monitoring events, click the
  button. You can also use the
 Space key to start and pause recording.FSMonitor is a macOS application that can monitor and report changes to your file system as they are happening.
Tracked changes include:
FSMonitor uses a privileged helper tool to receive detailed file system events from macOS. The first time you run FSMonitor, the app will ask to install this helper tool. This requires an administrator password.
The helper tool runs in the background only to provide file system events to FSMonitor and to the fsmon command-line tool. If the helper tool is missing or out of date, launch FSMonitor again and follow the installation prompt.
You can remove the helper tool with the "Uninstall Helper Tool..." command in the FSMonitor application menu.
To start recording file system events, launch the FSMonitor application and click the button in the toolbar. To pause monitoring events, click the button. You can also use the Space key to start and pause recording.
You can start and pause FSMonitor multiple times.
You can save FSMonitor recordings (with ⌘S) and reopen the saved documents later. You can create, save, and open as many documents as you want.
If you want to reduce temporary file noise while recording, see Cleanup mode.
Many applications create temporary files and delete them again almost immediately, or make several modification to a file in a row. These transient events are often useful while debugging, but they can also make a recording much harder to read when you are mainly interested in lasting changes.
FSMonitor 2 can remove these events that don't directly contribute to the current state on disk. To enable this, use the pruning popup in the filter view and choose "Prune Redundant Events".
You can also configure this directly via the menu of the recording toolbar item:

If cleanup mode is active while "Permanently Discard Events" is also checked, transient events removed by cleanup mode are also removed permanently. However, note that cleanup mode needs to retain information about many events to correctly track redundant changes. This may include events that do not match the current filter, even when "Permanently Discard Events" is checked. For this reason, cleanup mode is not necessarily the best choice when you want to keep FSMonitor running for a long period of time.
FSMonitor categorizes file system changes into the following categories. You will see them referenced in different places in the app. The categories are:
FSMonitor provides three different ways to display the changes that occurred. You can choose between the view modes with the following control in the toolbar:

To switch to another view, click on the segment that corresponds to the view you want to switch to. The segments represent the tree view, list view, and text view respectively. The actions are also available from the "View" menu, or you can use the corresponding shortcuts ⌘1, ⌘2, and ⌘3.
It is worth pointing out that in all view modes you can:

The tree view gives you a custom hierarchical overview over the changed files.
The file icons have a little badge at the top right that indicates how many events have been recorded for that particular file path. If it has the red "strike through" overlay, it means that the last known event for that file deleted or moved it. Note that this doesn't necessarily mean that the file is currently not present. For example, it could have been recreated after the recording stopped.
If you are not interested in changes happening in a certain directory, you can hide events for it. Simply select a file and press the ⌫ (Delete) key. This will hide all children of the directory, and the file will be displayed with a distinctive gray look:

To reveal hidden children again, press ⌘⌫ (Cmd-Delete).
These actions are also available from the "View" menu, and from the contextual menu.
You can open files in other applications as described in the section Opening files in other applications.

The list view displays all file system events in a list. By default the newest events are at the bottom, but you can adjust the sort order by clicking on the column headers. This view uses the least system resources, so it is a good choice if you have a lot of changes that might slow down the app.
The list has the following columns:
You can open files in other applications as described in Opening files in other applications.
The text view displays file system events in a list similar to the list view, but as plain text. This means that many actions from the native macOS text editing system are available, most prominently search. Press ⌘F (Cmd-F) to start searching:

You can open files in other applications as described in the section Opening files in other applications.
Sometimes you may want to start over with a clean window after you already started recording. To do that, click the  button in the toolbar. The same action is also available from the "Clear" menu item in the "View" menu, or you can use the
 ⌘K (Cmd-K) shortcut.
Clearing only hides events from the current view; it does not delete them. You can display them again by clicking and holding the button and then choosing "Reload":

You can also use the "Reload" menu item in the "View" menu, or simply use the ⌥⌘K (Opt-Cmd-K) shortcut.
You can filter which events are being displayed using a filter:

To show or hide the filter, click the  button in the toolbar. You can also use the "Filter" menu item in the "Edit" menu, or use the shortcut
 ⌥⌘F (Opt-Cmd-F).
You can filter for:
It is possible to create filters with complex nested rules. To create a nested rule, hold the ⌥ (Option) key and click the button with the three little dots:

You can save filters as templates so that you can reuse them later. Use the "Save as Template..." button in the filter view to save the current filter. Saved templates can be loaded from the filter template popup in the filter view or from the filter menu in the toolbar.
To delete a saved filter template from the toolbar menu, hold the ⌥ (Option) key and choose the template you want to delete.
When "Permanently Discard Events" is selected, all events that do not match the current filter get discarded permanently while recording. This can help to improve performance. With a narrow enough filter, it is realistic to have FSMonitor running for longer periods of time. To warn you that FSMonitor is discarding events, the filter icon in the toolbar will show a ⚡︎ symbol when a filter with this option is active.
The cleanup popup can also be set to "Evict Transient Events". See Cleanup mode for details.
FSMonitor can open the files it displays in the Finder, the Terminal, or in a Quick Look preview.
You can double click on a file to reveal it in the Finder (except in the text view, where you can ⌘-click).
More options are available from the "File" menu, with the following shortcuts:
⏎ (Enter) to reveal the selected file in the Finder⌘⏎ (Cmd-Enter) to reveal the selected file in the Quick Look preview.⇧⌘⏎ (Shift-Cmd-Enter) to reveal the selected file in the Terminal. The selected file's parent directory (or the file itself if it is a directory) will be the working directory of the opened Terminal window.The same options are also available from the contextual menu for displayed files. Right-click (or ctrl-click) on a file to bring up the contextual menu.
To toggle the inspector, click the  button in the toolbar. You can also use the "Show Info" menu item in the "View" menu, or use the
 ⌘I (Cmd-I) shortcut.
Use the inspector to examine the details of the selected event. It displays all information FSMonitor was able to collect about it.
It is divided into several sections:

This is only visible when using the tree view, if the selected file has multiple events associated with it. Click on the arrows to switch between the events.
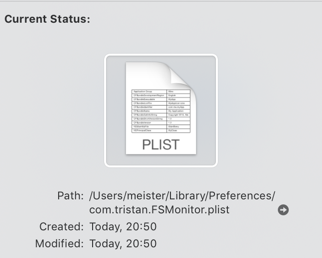
The status section displays information about the current status of the file. Thus the information displayed is similar to what you would see in a Finder "Get Info" window.
You can click on the little arrow icon after the path to reveal the file in the Finder.
If the file is not present anymore, only the path can be displayed.
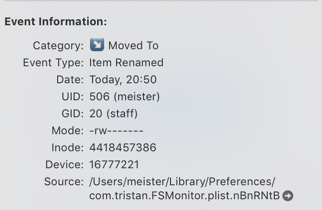
The event section provides all the information FSMonitor knows about the event itself. It has the following fields (not all of these are displayed all the time):
stat Terminal command.stat command.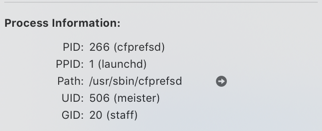
The process section displays the information FSMonitor has about the process that caused the event. Note that in some situations only the PID will be known, for example if the process exited before FSMonitor could gather information about it.
The section has the following fields (not all of these are displayed all the time):
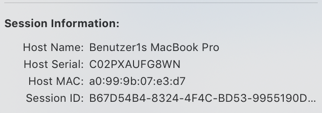
This section displays information about the "session" under which this event was recorded. Every time you start recording, FSMonitor starts a new session. This can be useful since an FSMonitor document could contain events recorded on different computers. The session information can help you identify the host computer.
The section has the following fields:
FSMonitor can export recorded events in formats that make it easy to analyze them with other tools. To export, use the "Export..." menu item in the "File" menu.
There are currently two formats available:
When you select the plain text format, you can choose whether event categories are shown as emoji or as plain text descriptions.
FSMonitor 2 includesfsmon, a command-line tool for monitoring file system events directly from Terminal. To install it, choose"Install Command Line Tool..."from the FSMonitor application menu.
The command-line tool uses the same helper tool as the app and must be run with administrator privileges:
fsmonprints events as they occur. This is useful for automation, shell scripts, logging, or piping the output into other tools. Press Ctrl-Cto stop monitoring.
By default,fsmonuses emoji to show event categories. Use--noemojiif you prefer plain text category names: